Thickness or height of your terrace structure
By Staenis | | Manual
Laying a driveway or terrace on solid ground: which terrace structure to choose and what height to use?
Whether you want to build a terrace, a pavement where cars will park, or a driveway, the terrace structure you should provide is roughly the same. Discover the most suitable terrace structure for your project and learn how high or thick it will be. For a durable result, use the Staenis grid in combination with drainage mortar. A winning team for an extremely strong yet draining screed. This way, you can enjoy your terrace or driveway for much longer!
The secret of a terrace or driveway that remains beautiful for years
How thick or high your terrace structure should be depends on various factors: the desired load-bearing capacity, drainage, rising damp, and stresses. We definitely recommend using a sub-base such as crushed concrete. This prevents subsidence and makes the terrace structure load-bearing. By compacting the crushed concrete with a vibrating plate machine, you densify and harden the soft subsoil.
For a strong driveway or a sturdy terrace, a screed or screed is also necessary. For a result that remains beautiful for years, install your screed using the Staenis grid, which you fill with drainage mortar or sand-cement screed. With these combinations, stresses in your floor disappear, and if you opt for drainage mortar, your screed is also water-permeable.
-
The Staenis grid is a handy tool to lay your own crack-free screed. This screed grid consists of slats and height-adjustable legs, which you can easily click together and adjust in height with a screwdriver. The grid divides the floor structure into small sections of 0.25 m². Et voilà, a stress-free substrate to tile on! This eliminates the risk of cracks, subsidence, and detachment of the floor. Your driveway or terrace will also not be damaged by frost, hot weather, or the sand washing out of the screed. So you can be sure that your tiles will not crack. Discover the screed grid and learn more about how it works.
-
Thanks to the drainage mortar, moisture is always drained away and your terrace floor will not freeze, become sandy, or expand, which means your driveway or terrace will last much longer. Draining mortar consists of (gravé) porphyry 2-6 mm stones, mixed with cement. Calculate here how much drainage mortar you need for your project and order your drainage mortar silo via the Staenis webshop. With a silo on your site, you can produce fresh drainage mortar at your own pace and for several weeks. Convenient, because this way you can choose your own schedule.
Good to know: You can of course also use sand-cement screed. Just make sure to have a draining subfloor, so that the screed can always dry out or drain into the subfloor.
Discover all the benefits of a draining terrace floor build-up with Staenis grid.
How thick should a floor structure for a driveway or terrace be?
The required height (thickness) of your terrace construction depends on various factors. Do you know how your driveway or terrace will be used, and how intensively? Then check in the table below which load class the paving must have. The load class is indicated in kiloNewtons (kN).
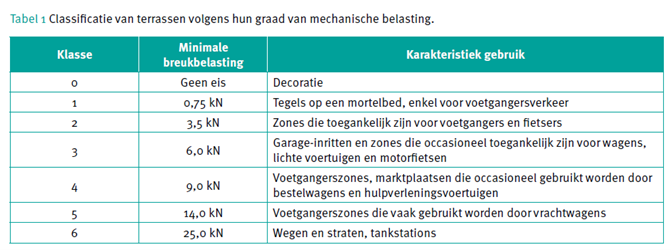
For illustration: If your terrace or driveway will be used by pedestrians and cyclists, you should aim for load class 2. This corresponds to a minimum breaking load of 3.5 kN. For areas that are occasionally used by cars, light vehicles, and/or motorcycles, the floor must have a load class of 3. This corresponds to a minimum breaking load of 6.0 kN.
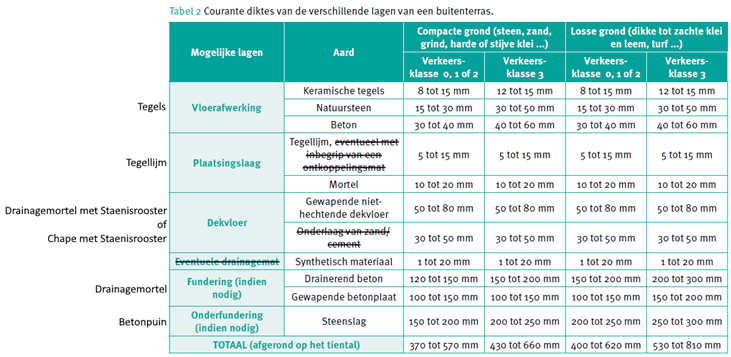
Now check in the table below which thicknesses the layers of your terrace or driveway should have, and how high the total terrace construction will be.
Tip: Check the type of subsoil on which your terrace will be placed and then the required load class. The type of subsoil on which the terrace will be laid will impact the thickness of the crushed concrete and drainage mortar layer.
What does my ideal terrace construction on natural ground look like?
Option 1: installing your terrace or driveway using the Staenis grid
The following terrace floor structure with drainage mortar allows moisture to drain away. Moreover, your terrace or driveway remains free of tension because you use the Staenis grid. This keeps the tile and joint work in top condition!
Terrace construction on solid ground - terrace/driveway - ceramic tiles, natural stone and pavers
-
Excavate the subsoil. When excavating the solid ground, reserve 10 to 20 cm in height for compacted crushed concrete, 2 to 5 cm to level the crushed concrete with drainage mortar (so that you can easily place the Staenis grid afterwards), and 7 to 8 cm in height for the drainage mortar screed, the tile adhesive, and the tiles or natural stone.
-
Then place a drainage pipe that leads into the settling pit or drain. Place the pipe at a slope so that the water can flow away.
-
Then pour 10 to 20 cm of concrete rubble in several layers. Compact each layer with a vibrating plate. This way, you avoid your driveway or terrace sinking later on. The concrete rubble provides a pressure-resistant base, but it must be permeable to water.
-
Install a sloping levelling layer of drainage mortar. This way, you will have about 7 to 8 cm left to adjust the Staenis grid in height. Let this layer of drainage mortar dry for one day.

-
Place the Staenis grid. Determine the correct height of a leg every 3 m using a laser. Place a long batten on it or use a string. This way, you can easily adjust the height of the intermediate legs with a screwdriver. Ensure a slope of 1.5 to 2 cm per running meter (depending on the roughness/unevenness of the tile surface).
-
Provide edge insulation around the screed floor so that it can expand and contract.
-
Start by pouring the drainage mortar onto the legs. This way, the height adjustment of the grid remains correct. Then fill each compartment one by one with drainage mortar. Discover more explanation for this step.
-
Level the drainage mortar flat with a large plastering trowel (60 cm length) on the grid.
-
Prepare a small amount of screed. Use 5 parts washed sand and 1 part cement. Mix well and add a little water. Spread the screed in a thin layer of about 5 mm on the drainage mortar (wet-on-wet). To reduce surface dusting afterwards, it is best to use pre-mixed screed from bags (e.g. sand-cement screed or Latermix Fast screed). It is stronger and pre-mixed in advance, so you get the same quality everywhere. This prevents sand and cement stains caused by a poorly mixed screed mix.
-
Smooth the screed with a large sanding board and then polish the surface with a screed trowel. This way you fill in holes and ensure that the tiles will adhere properly.
Good to know: you can also replace the drainage mortar in this floor structure with a sand-cement screed.
Tips for installing a terrace or driveway on soil, using the Staenis grid
-
Do you want to install a terrace structure on solid ground for a terrace or driveway, finished with curbstones and ceramic tiles, natural stone, or pavers? Then you use the same method as above, with the difference that in step 1 you also need to place the curbstones in the screed.
-
Do you want to install a terrace structure with a drainage channel on solid ground for a terrace or driveway, finished with ceramic tiles, natural stone, or pavers? In that case, you use the same method as with terrace structure 1, with the difference that in step 1 you also install the drainage channel in the stabilisé.
Option 2: installing your terrace or driveway in the traditional way (without Staenis grid)
You can also install a terrace or driveway in the traditional way, without a Staenis grid. How do you go about it? Your tiles need to be placed on a solid foundation so that they are stable and can withstand impact. For this, you need to make the necessary preparations, such as marking out the dimensions, excavating your plot, installing the sub-base and edging. After the main foundation, you place a geotextile, a reinforced screed, and then lay the tiles.
-
Marking out dimensions for your driveway or terrace: A first step when installing your driveway or terrace is to demarcate the area to be excavated.
-
Excavation work for your driveway or terrace: Once you have marked where the top of your driveway or terrace should be, calculate how deep you need to excavate the ground.
-
Placing a sub-base for a driveway or terrace: The foundation beneath your ground covering prevents the soil from sinking over time under the weight of the covering and the pressure that will be exerted on it. For a driveway in tiles, you first use a layer of crushed stone (20-25 cm thick). On top of that, you place a root barrier with a layer of paving sand 5 to 7 cm thick. Maintain sufficient slope (1 cm per meter) so that rainwater can be quickly drained away.
-
Installing edging for your driveway or terrace: A curb stone prevents the tiles from sinking or shifting over time.
-
Placing the foundation of a driveway or terrace: The foundation, together with a subfoundation, provides a stable base. The foundation layer for a driveway can consist of stabilisé, sand, or gravel. This depends on the type of paving you are going to use.
-
On top of this comes the screed or the sand or gravel bed, on which you later place, glue, or apply the finish with mortar. Good to know: For gluing tiles, use grey tile adhesive; for gluing natural stone, choose white tile adhesive.
-
Laying and grouting tiles: You fill the joints between the tiles. This creates a single, seamless, and beautiful whole.
Would you rather be sure of a durable result, without the risk of cracks and moisture problems? Then install your terrace or driveway using the Staenis grid, a handy DIY system. Learn here how to get started.
If you install your terrace or driveway using the Staenis grid, it will not be affected by stress or moisture. This way, you avoid damage and are assured of a long lifespan. Moreover, you can set your own schedule. Find the ideal terrace structure for your project and watch the installation video. Calculate here what you need for your job and order your supplies in our webshop. Off you go!