How to screed a terrace
By Staenis | 16/04/2021
How to screed a patio?
Planning to build a terrace so you can enjoy outdoor living and your garden even more? Then you may have some questions. Which screed is best to use for a terrace? What is the minimum thickness of screed for a terrace? How can you make screed for your terrace? Read our advice for screeding a terrace and achieve a professional result that will remain beautiful for about ten years.
Screed your own terrace: avoid moisture problems and cracks
The most common mistake when installing a terrace? Often, traditional screed or stabilised sand is used when screeding a terrace. The construction of the terrace usually looks as follows: solid ground with a stabilised sand bed (screed) on top and tiles that are glued or placed in mortar. But with this terrace construction, you run a high risk of damage: loose tiles and joints, a crumbling cement subfloor, or unsightly efflorescence. All these types of damage have the same cause: moisture problems. Fortunately, you can easily prevent moisture problems on your terrace. With this floor construction, you avoid moisture problems on your terrace and achieve a stress-free terrace floor. In addition, a slope of at least 1.5 cm per metre is necessary to ensure proper drainage. Make sure this slope is directed away from the house. Watch the video and learn how to install your own permeable terrace.
Discover a water-permeable alternative to traditional screed
With a traditional terrace construction using screed or stabilized sand, water will seep between the joints and along the edges of the terrace. This water penetrates the stabilized sand bed, which is usually not sufficiently permeable. As a result, the sand bed, combined with rising ground moisture, becomes saturated with water. When it starts to freeze, this causes frost damage. High temperatures also create additional stresses, which can again cause damage. This process is further accelerated by water pressure from the surrounding lawn. Would you prefer a solid, water-permeable screed for your terrace? Then opt for a floor structure with drainage mortar, as this offers you several advantages. The water will always drain away and there is no risk of your terrace floor freezing or expanding. As a result, your floor finish (such as tiles or natural stone) will last much longer. A sustainable and cost-effective alternative to a traditional terrace with screed or stabilized sand. You can install this unique floor structure using a handy DIY solution: the StaenisGrid. You can use this grid outdoors on bare soil, or as a draining solution on a concrete slab. Curious and want to screed your terrace yourself? Discover here how to do it.
Which screed should you use for a terrace?
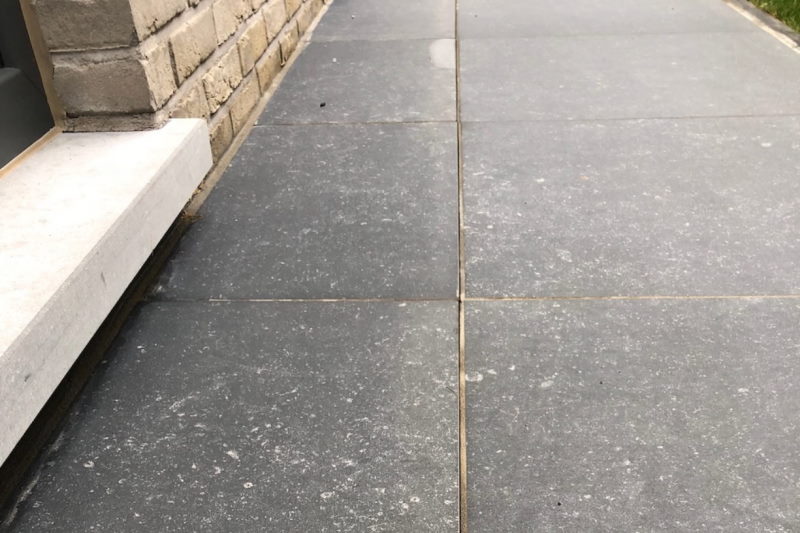
So you don’t screed your terrace with traditional screed, but with drainage mortar. Once dried, your screed floor is completely water-permeable. Drainage mortar consists of gravel (porphyry) stones, cement, and water. The mixing ratio for drainage mortar is as follows: 5 parts fine gravel stones (0/2-0/6 mm) to 1 part cement. Note: the drainage mortar must be finished wet-on-wet with a thin layer of screed. So you use a screed top layer. This layer of screed must adhere to the wet drainage mortar. The screed layer fills all the holes at the top of the placed drainage mortar nicely. This makes tiling easier and you need less adhesive. For the screed layer, use a mixing ratio of 5 parts coarse river sand (0/4-0/7 mm) to 1 part cement, or ready-mixed screed. Discover the ideal floor structure for your terrace and quickly calculate how much drainage mortar and screed you need for screeding your terrace. Good to know: making large quantities of drainage mortar or screed for your terrace is not necessary, you can simply have it delivered ready to use and dry in a drainage mortar silo.
Levelling your terrace with drainage mortar and the Staenis grid: the advantages
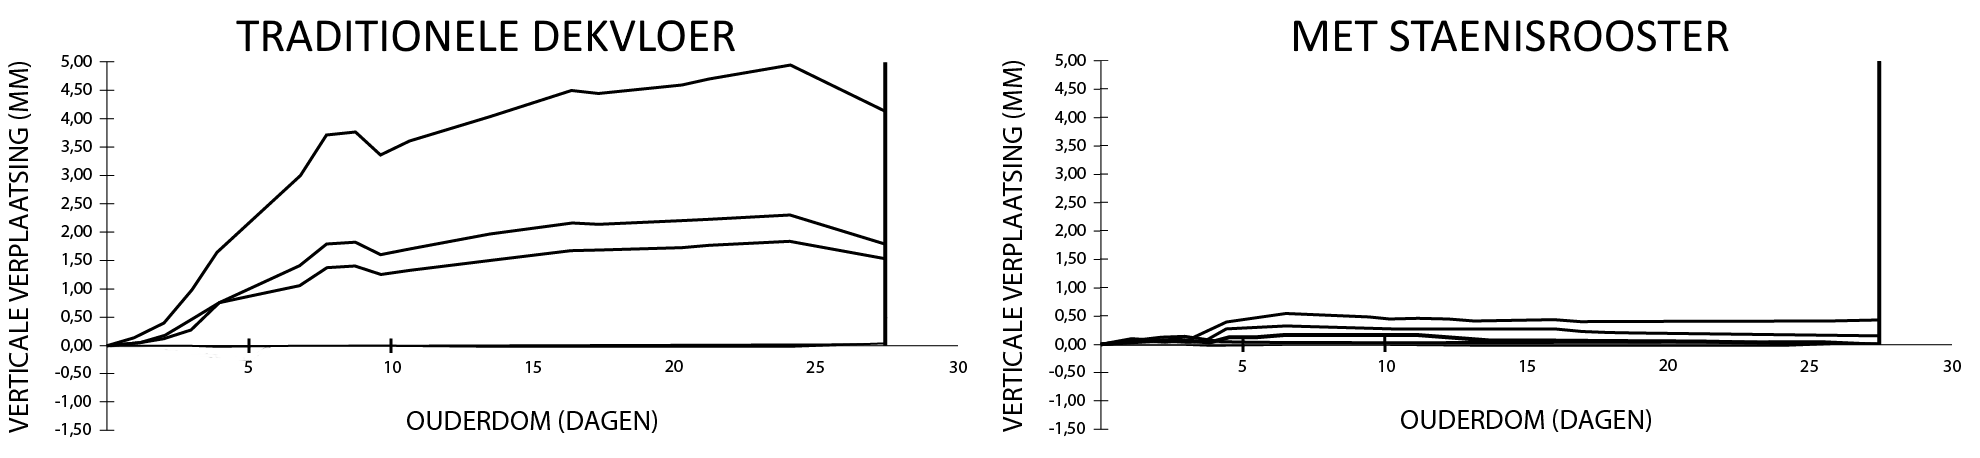
Laying your terrace with traditional screed is asking for cracks and moisture problems. There is another way. If you build your terrace with drainage mortar and the StaenisGrid, you get a solid, flat screed and avoid damage. Impressive: a traditional screed floor with reinforcement mesh or fibers deforms over time and can become up to 5 mm uneven at the corners. With the StaenisGrid, on the other hand, your screed remains perfectly flat. This grid divides the screed in such a way that the stresses are greatly reduced. This prevents shrinkage damage and subsidence, even in the long term. Also consider the financial benefits: the stress-free subfloor in combination with the draining drainage mortar means that a drainage mat with an average price tag of 25 euros per square meter is not necessary. If you want to screed an area of 50 m², you can quickly save about 1250 euros with the StaenisGrid. Discover more advantages of a water-permeable screed for your terrace.
What is the minimum thickness of a screed for a terrace?
A reinforced unbonded screed for an outdoor terrace is typically 5 to 8 cm thick. If the screed is unbonded, it must have a minimum thickness of 5 cm and be reinforced with a metal mesh of at least 50 x 50 x 2 x 2 mm. This reinforcement mesh should be placed in the middle third of the thickness. If you install your screed using the StaenisGrid, the minimum thickness of your screed is always 5 cm. You can adjust the height of the grid up to 9 cm. If you use extension legs, you can go up to 13 cm in height. You can even adjust it higher, but then it is actually better to raise the underlying layers. The StaenisGrid also replaces the reinforcement mesh in the screed.
Laying a permeable screed for your terrace: step-by-step plan
- Choose your terrace floor build-up with the handy floor build-up tool and carry out the necessary preparations.
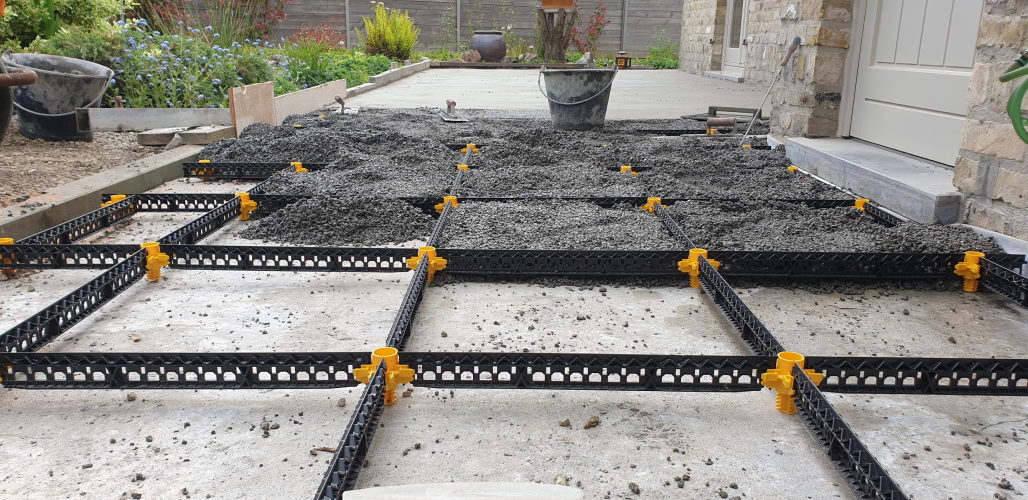
- 2 Are you going to install your screed on solid ground? First provide a layer of crushed concrete 10 to 15 cm thick, or thicker if you need to raise the level more or if your terrace needs to support a car or truck. Compact this layer of crushed concrete so that there is no risk of the terrace subsiding later. Moreover, this layer is water-permeable. Then place a sloping 5 to 10 cm drainage mortar on the compacted crushed concrete. Voilà, you now have the ideal subfloor to install the StaenisGrid!
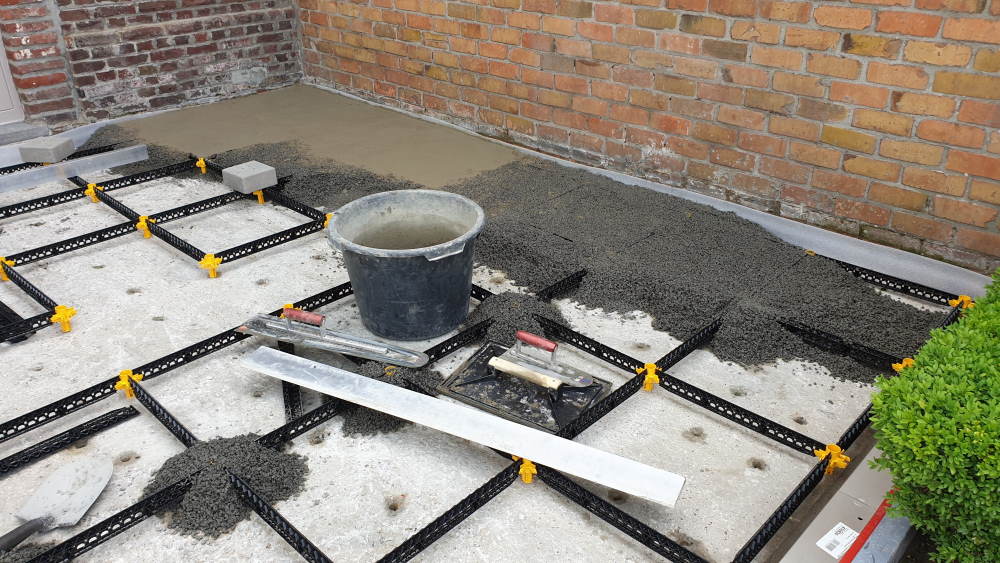
- 3 Place the StaenisGrid and fill it with drainage mortar. Place the mortar just slightly higher than the top surface of the grid. Lightly press the drainage mortar with your trowel or long screed bar.
- 4 Drag the excess drainage mortar off the grate with a long screed bar or aluminum straightedge.
- 5 Sprinkle screed on the surface and rub it in with a large float. This way, all irregularities are filled in. Make sure not to create a dip or bump in the compartment and always keep it level.
- 6 Polish the screed with the screed iron. Hold the screed iron slightly tilted and rub it over the surface.
- 7 Check and correct each compartment for flatness to avoid cavities in the grid.
Would you like a complete step-by-step plan tailored to your project? Find the ideal floor structure for your terrace here and view the instructions.
Would you like to screed your terrace yourself? You can do it even if you have no experience! With the help of the StaenisGrid, you are guaranteed to achieve a flat and durable terrace. Discover here how to get started. Curious about the price of screed for outdoor use? Calculate here how much drainage mortar and screed you need and easily order your supplies online.